Rabu, 08 Februari 2012

Install External Fonts in Opera Mini


No doubt that Opera Mini is the most popular mobile browser. Opera mini compresses the web page to make it compatible to view on mobile device, it also allows user to synchronize bookmarks and browsing through opera link. This browser is available for almost all phones around us. If you are Opera Mini user then you might be aware that it displays some boxes when it comes to display some external fonts which are not installed on your device. But latest mobile phones come with scripts to display foreign fonts so you don't have worry. But, if you use comparably old phone then you might have this problem. And here is the solution too, just follow the simple steps below to install foreign fonts in Opera Mini:

  • Run Opera Mini
  • Go to Option > Enter Address
  • Type about:config in there and click ok to continue
  • You will be taken to Power user option for Opera Mini browser
  • Scroll the page down and find Use Bitmap font for Complex Script
  • Now, Select Yes from the combo box and click on save

You are done, now you may not have trouble reading texts on external fonts.

This feature of Opera Mini converts the complex and foreign fonts to image and illustrates on the page. I had trouble reading Nepali characters before I knew this feature.

Jumat, 30 Desember 2011

Create Attractive HTML, CHM and PDF help files for Free


create-chm-html-pdf-help-files-for-free
Help file is often used to help users to wayout through several tutors with some software or any other products. An attractive help file will suerly entice your user to remember you again in future. There are many paying software over the internet to create readymade compiled help files for you. If you are familier with HTML and JavaScript then its not a big deal for you. But if you are searching for a free help file compiler then you can try HelpnDoc.

HelpnDoc is actually a shareware programme but you can access full feature with the trial version too, just a matter of their credit link. You may edit the file later to remove the link if its bothering you.
It has a very friendly user interface. You may just give it a try download HelpnDoc from here.

Alternative for HTML:

Do you have microsoft word?
If yes then you can create very attractive and enticing help files using microsoft word processer. Just type your tutorial on the word processer and save it as Web Page to export as a html help format. With MS word you may embade images and screenshots to illustrate the process, you can also use bookmarks and hyperlinks to direct the table of contents to respective portion of the tutor page.

To save as PDF
I recommend you to use PDFcreator if you want to export your help file as PDF. Just download and install PDFcreator from http://pdfforge.org.
Each time you want to save your document as PDF go to File > Print and select your printer as PDFCreator and follow the procedure.

Rabu, 28 Desember 2011

2 Ways to Set up timer to Shut down PC automatically for Free

how-to-shut-down-pc-automatically
Yesterday night, I was watching a movie, I don't know if the movie was so boring or I was feeling to tired and as a result, I fall asleep and started enjoying my dream and the PC remain turned on for the whole night. When I woke up in the morning, Damn!! I forgot to shut it down.
    This is not only my story if I am not mistaken. While surfing through the internet I came out with some option to set up timer for shutting down the pc automatically. Lets start;

Method one:
    This is the most easiest way here and you don't need to download any software for it. As me, if you are watching a movie then just calculate the total duration of the movie and convert it to seconds.

For example, if you are watching a movie of 1 hour and 30 minutes then just convert it into seconds. Here, 1 hour 30 minutes becomes 60+30=90 minutes ( because 1 hour = 60 minutes)
Multiply 90 by 60 to get it in seconds i.e. 5400 seconds
  • Go to Start > Run
  • Type shutdown -s -t 5400 and hit enter
Here, 5400 is duration of the movie in second which we calculated in the previous steps.
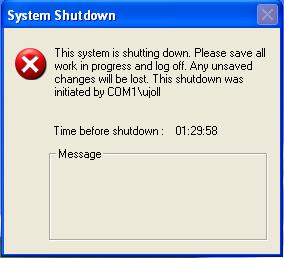
You will see a dialogue box as below, You are done!!
What if I want to stop the shut down process? :/ 
If this is the problem then just,
  • Go to Start > Run
  • Type shutdown -a and hit enter.

Method Two:
You can also use timer software to set up scheduled shut down timer for your PC. I found a freeware named Switch Off, you may give a try.
  • Download Switch Off here and install it.
  • View Switch off screen shots for more information and using tutorials.
That was it, Cheers !!

Selasa, 27 Desember 2011

5+ Different ways to use NTC GPRS for Free

Hello everybody,
Finally I finished writing this post especially for those Nepali users who are subscribed to Nepal Telecom GPRS. I don't know if it works for other networks or not, if you think this is helpful then keep reading and don't forget to share too.

How long have you been using NTC GPRS?

Before starting, let me remind you about a bug existed in NTC GPRS system some months ago. Yeah, its 1 MB bug and it was very benificial to use NTGPRS for free. Unfortunately there is no longer the '1 MB bug' now. You may not be getting if you are a new user of NTC GPRS. Don't worry, there is still more than half story to be told, keep reading.
Lets come to the point, here are 5 ways described below which will absolutely help you to use free GPRS in NTC.

#1. Use UC browser (again):
Who says this doesn't works anymore? Though the 1 MB bug is gone, there's still a loophole in the system. Download the light Java version of UC browser from here. Now keep running UC browser each and every time you use applications such as mig33, Opera mini. Attention!! only the running of UC browser will do nothing, you must browse at least one site through UC Browser to keep the connection alive. When the data transfer reaches 2-3 MB the connection gets closed by the network itself and you will not be charged. Here is the step by step procedure:
  • Download and install UC browser.
  • Run UC browser.
  • Browse any one site in UC. Example: Click on Facebook after loading of start page.
  • Now run any application (e.g. mig33, Opera mini) which uses GPRS and keep using until the connection gets closed by network itself and you won't be charged.
For non-multitasking/Java mobiles:
Read my previous post here and follow the process to compile UC Browser with the Java application you want to run.
After you done, all the process is same as above.
Things to remember:
  • Just running the UC won't do anything, you need to browse at least one site through UC to keep the connection alive.
  • Don't close the connection even if the data transfer crosses 3-4 MBs, just wait for the right time when the network itself closes the connection.
  • Use the light Java version of UC browser. It is highly recommended if you are using old smartphones having very low RAM (eg Nokia 6600, Nokia 7610).
# 2. Making a call:
This is also an effective method but it may not work always. The aglorithm we are implementing to use NTC GPRS for free in this method is to end the connection at the instant of time when GPRS is online but inactive. Try it yourself.
Use GPRs as much as you want but at last don't close the connection by closing the application, just minimize it and make a call to any number (I use 1414). When the GPRS logo gets inactive, switch off or re-start your handset immidiately without ending the call.
Note: You must run UC browser for this process.

For non-multitasking/Java mobiles:
After using internet don't close the application. Make a call to your number from your friend's mobile. When the GPRS logo gets inactive, restart your handset and you will not be charged.

#3. Transferring the account balance:
Use GPRS under your balance limit and when you are done, transfer the whole allowed amount of your account balance to your another NTC number. This method is so much screwing and also very complicated for Java mobiles. I will not be describing the method for non-multitasking phones because of it complication.

#4. Vagwan Varosa:
This method actually doesn't works always. I mean, it has a very less probability of occurrence. What you need to do is to use GPRS at the evening before you sleep. Don't end the connection by closing the application befor sleeping, leave it as it is. When you wake up in the morning, use the same connection and browse for several minutes (100-200 kB sometimes). If the connection gets closed itself then you may not be charged and if it doesn't then....just give up this method. This has a very low probability so I named it Vagwan Varosa.

#5. Works 100%:
Use any one of the above. If you are not satisfied yet then Subscribe to NewbiesWay. There are more hacks, tweaks, tips and tricks to be discovered and shared here. Subscribe through email or twitter @ekeshpd

If you have any question, then use the comment box below. 
Cheers!!!!

How to Hack and bypass Deep Freeze without Password

Did you forgot your DeepFreeze password? Do you want to unfreeze your office/school computer to install game or other softwares? Do you want to amaze your pal by unfreezing his computer without knowing the password?
I must admit that you are at the right place now.

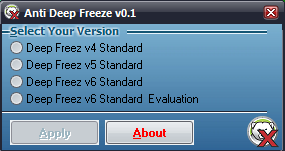
While surfing through the internet I found a working AntiDeepFreeze software which hacks farsonics DeepFreeze security system and bypass the login to the power user settings.

If you forgot the password of the DeepFreeze version installed on your computer then, follow the steps below to first Unfreeze it without password and then uninstall it later.
  • Now, select the Deep Freeze version installed on your computer and click on Apply.
  • If everything goes fine then, a dialogue box will appear asking you to enter the password.
  • Hit Enter without typing anything on that box, you will see the power user option, select Boot Thawed option to unfreeze your computer after a reboot.
To uninstall:
  • Reboot the computer after thawed.
  • Now, Run the same installation file you have used to install the Deep Freeze before to proceed the uninstall.
Warning: Remember to close all the application before proceeding and don't run the ADF software more than once.

Senin, 26 Desember 2011

How to Run Multiple Java applications at a same time in a Java Phone

Its almost impossible to run 2 or more than 2 applications in Java phones. But I found a solution which may help you to combine two or more than two JAR application to a single JAR midlet to run in non-multitasking phones (Example: Nokia s40 phones).

I will discuss the most effective method you may implement on creating a combined JAR midlet with two or more JAR files. I will post an update for second method.

Follow the simple steps below to combine two or more JAR files to a single midlet.
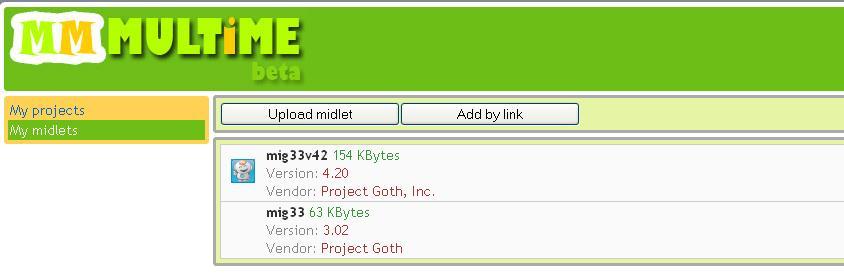
  • Go to http://multime.org
  • Click on Register and fill the form to create a new account and login
  • Now click on My midlets
  • Click on Upload Midlet to upload two midlets you want to combine or you may use Add by Link if you have the direct download link of the midlet
  • After you done, click on My projects
  • Click on New Project and name your project and click OK
  • Click on the listed project you just created (i.e. My Project)
  • Click on Add midlet and select the midlets by clicking on green coloured '+' button to add the desired midlets. (You can also add the same application by clicking twice)


(You may click on Permission button to set permission on your midlets, certify etc or don't touch that if you are not sure whats going)

  • Click on Build button to build the new combined midlet
You will be given download links for both Jar and Jad file of the combined midlet if everything goes fine.

Download and test it on your phone. If it didn't worked then use the comment box below, I will be very happy to help you out.

Sabtu, 03 Desember 2011

Save Money with PriceBlink while shopping Online

Hello all,
After a long break finally I managed to write. I know you have already figured out what is this about. I don't have to mention that this is all about money, we are doing all these things in our daily life for the money. Don't you agree?

Lets come to the point. When I was playing as usual I came across an awesome Firefox add-on this morning. I found it very useful for me(hope you too) and thought of sharing it.

I am talking about PriceBlink. It compares prices of the product you buying online with the same product on another online shopping site. It also notifies about available discount coupons at the moment you visiting those sites. You can simply save your money and time while shopping online.

That was a small review on PriceBlink, now just try it yourself. Click here and add it with your Firefox browser by clicking Add to Firefox button. Restart the Firefox and you can see a symbol at the right bottom of the Firefox window as shown in the image.


Now each time you visit internet marketing sites like Amazon, Godaddy, Hostgator you will see something as illustrated in the image below. (click to enlarge)


If you have any difficulties on installing or using PriceBlink then feel free to ask through the comment section. Enjoy and don't forget to subscribe NewbiesWay. Thank You

Senin, 21 Maret 2011

Best Free PDF Compilers Ever

Needless to say that, ebook acts as fuel on your journey over the internet. It doesn’t matter weather you write ebooks to scream in front of people or read ebooks to listen the loud scream of others.

I am talking about PDF ebooks. It is not necessary to mention that PDF is most popular and widely used ebook format. It might be because of its portable file size, easy availability of reader or because of many enticing features embedded with it like security of your articles with password, encryption etc.

Here I am reviewing two best free PDF compilers.They are better free PDF compilers in my opinion only ;)

PDF Creator: This is open source software with many features like security with encryption, password protection, watermarks etc. It can be used both standalone or by installation. I recommend you to use word processer (e.g. MS Word) to write your book and then compile it using PDF Creator.
Just click on add button, browse and select your document and click save button to compile.

Open Office: Another excellent freeware, it looks like MS Word having very user friendly interface. Download and install it to your computer. After that you open the program and design/write your book there. At last click on the button saying save as PDF.
This one is not recommended because of its dizzy file size (150+ MB)

Kamis, 17 Februari 2011

Advanced Tag Editor For Windows 7

advanced-tag-editor-for-windows-sevenRecently one of my friend upgraded to windows seven. I was shocked to hear that there is no advanced tag editor option in WMP 12. Its obviously insane. Advanced tag editor is used to organize tracks in PC, but Windows Media Player 12 which is embedded with the newest operating system MS Windows 7 possess lack of advanced tag editor option in it.

So I tried to search if there is any alternatives for the tag editor and found a cool freeware tool called mp3tag

This is a very free tool with very useful features such at renaming on basis of file, creating playlists etc. It also supports online databases e.g. Amazon etc more.

So if you have windows seven and if you are hitting your head for advanced tag editor then go to http://mp3tag.de and download this free tool which is brutally easy to use.

Direct Download Link

Sabtu, 01 Januari 2011

Create an Animated Fake Progress Bar using PS and ImageReady

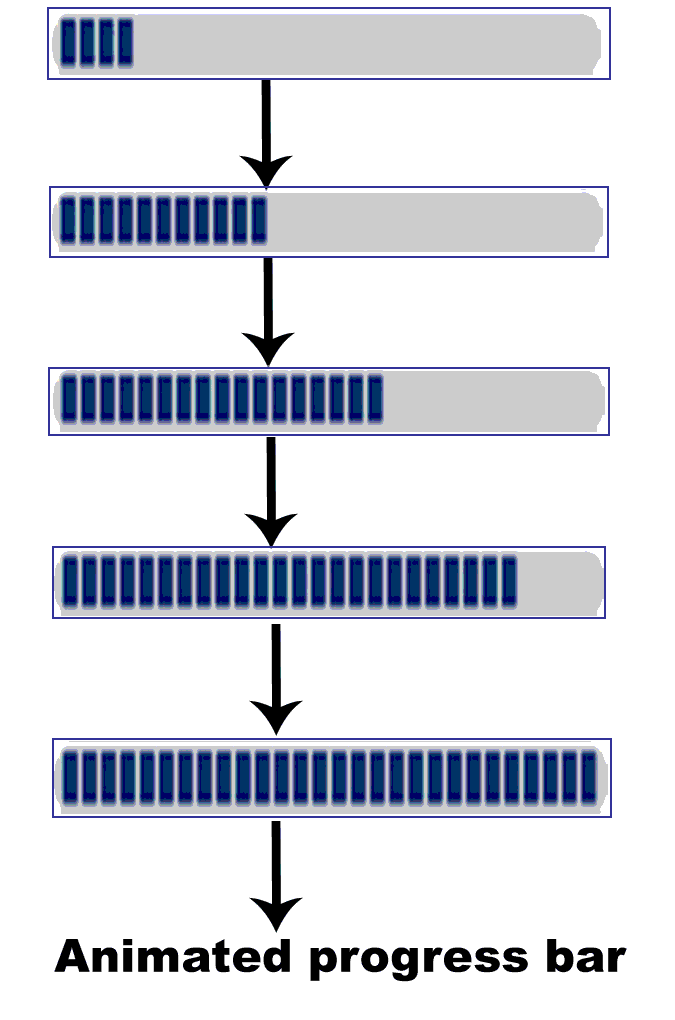
Creating a fake progress bar with JavaScript will be secondary method if you try this method once, because you need a fake one not a real.The way we are going to use now must be the easiest way. If you already know how to animate using Imageready then I am sure that you know how to do, if not then take a look at the image, here we shall call the blue boxes as Progress bar on the following steps though its a fake one. Now I am sure that you have figured how does it works. Lets start,
      • Run Photoshop.
      • Create a new transparent image (150x50px)
      • Draw a small, blue box using Rectangular Tool as shown in the above screen shot.
      You may change the color of the box according to your will.
      Do not bother yourself by drawing new boxes each time, as it is loss of time and they may not be identical to each other, so use Alt+Left Click and drag forward to make identical boxes.
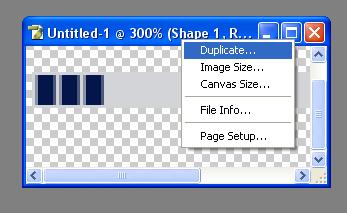
      • After creating few such boxes, duplicate the image by right clicking on the title bar of the image as on the screen shot.
      • Merge the layers of the duplicate image.(Use Shift+Ctrl+E shortcut)
      • Now left the merged one and start working on the another one.
      You may ask,"What working?"
      The work is expanding your Progress bar, we need several more images for our Progress bar to complete, isn't it?
      • Use Alt+Left Click again and drag forward to add other blue boxes to expand the Progress bar.
        Following the steps up to here, I think now you are aware of the concept we are using. That is,"Expand the Progress bar > Duplicate the image > Merge the duplicated one > Expand the Progress bar again".
        Now, your job is to expand the Progress bar till the end. Just use the concept above and remember each time you merge the image, the progress bar should be expanded a while, the expansion of the progress bar can be according to your will.(i.e. how speed you want your progress bar completed)
        Let us consider, we ended the Progress bar with 5 different(merged) images as on the screen shot below.(click to enlarge)

         
        • Create a new image of same size(150x50px).
        • Now select Move Tool from the Tools window.(or press V)
        • Drag and drop the merged images just one above another in ascending order.
        Didn't get? Do it as below:
        • First drag and drop the First step image.
        Here the First step image is the first merged image of Progress bar.
        • Again drag and drop the second one just above the first one....and so on.
        It will form an individual image with several layers. Here the layers are the images of the Progress bar we created by merging the small blue boxes in previous steps.

        Proceed to Animating
        Congrats!! You successfully completed the steps in Photoshop and now its time to animate our Progress bar using ImageReady.
        • Just click on Edit in ImageReady icon at the bottom of the Tools window.
        • Go to Window and click on Animation.
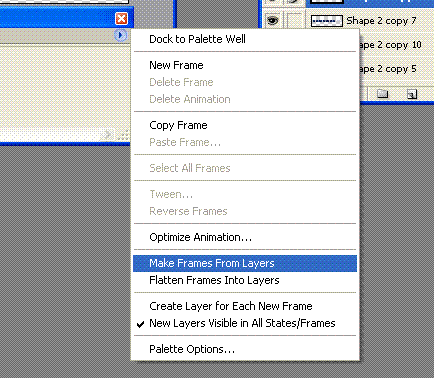
        • Click on the small arrow button at the top right side of the Animation window and click on Make Frames From Layers option.
        You are done!! Click on the Play button at the bottom of the Animation window to check the result.
        Does it works ?
        If yes then, Go to File and select Save Optimized option to save the image.
        If no then, Go to the top of this post and start reading again. Thank you.

        Guest Post in PC Hacks

          Sabtu, 25 Desember 2010

          Analyzation of a Blog, A Newbie's Analyzation

          I don't know if this is the right way to start a review, in this post I am trying to review a blog.
          Needless to say traffic is a vital word for a blogger, so the traffic made me to write this one.


          I am talking about RHA(Rafay Hacking Articles). If you are also a freak like me then RHA might not be a new word for you.
          Now I suppose that you already know RHA and you are also a regular reader of RHA like me then, I am asking you to remember a post by Rafay published in November 2010 about linking the webmasters with low PR.............
          Can you remember?
          If yes then ok, if no then take a look here.

          Now you are aware of the main motive of this post. It is difficult to survive as a newbie blogger in the network. NewbiesWay is neither a blog with 200 unique visitors nor with Page Rank 1 as the requirements of the post and it is new too but I decided to give it a try, lets see if it passes the exam or not.

          What is RHA ?
          Hmm.... if you are asking this question before visiting RHA then you are a stupid but if you are asking after visiting then you are the king of stupid. Let me brief, RHA is a tech blog where articles are published in categories Ethical Hacking, Internet Security, etc and many more.

          About the Author
          The main author of the blog is Rafay Baloch, computer engineer whose nationality is Pakistan. Except RHA he is owner of techlotips.com and his articles can be found in other blogs like MBT. He also published a book A beginners guide to Ethical Hacking this year which is focused in all newcomers.

          Popularity and Traffic
          If you googled keywords such as ethical hacking and security, Rafay, hacking articles, you will find rafayhackingarticles.blogspot.com in the first page(look at the screenshot below). That means there is no need to mention more about the popularity of the blog. Talking about traffic of the site then it is a PR 4 blog with 10000 and more unique visitors per day & more than 13000 RSS subscribers.

          Why should I visit RHA?
          You are emperor of stupid if you are asking such question now. If I gave all the answer then what will you do ? You will remain a newbie for your whole life. Why don't you visit yourself and find the goddamned answer ?

          At last
          Now, I am sure that you visited RHA and if not then you will visit after finishing reading. RHA is a PR 4 blog which is popular with high ranks among the search engines even without a premium domain, this may be a point inspiration for every mother's son(like me) who wants to be a successful blogger and a loud slap for the one who says that it is necessary to get a premium domain for higher rank in search engines and to gain popularity among the visitors.

          Jumat, 17 Desember 2010

          Create Own File Server with HFS

          Sharing files over internet can be done with many file sharing sites over the internet. There are many site with free file sharing service. But we don't like many of them coz of annoying ads, surveys, limitation in file size & btw you need to upload file to their server at first which may be difficult in sharing files with large sizes.
          Files having larger size like 100, 200 MBs are very difficult to upload in the network where I am located. I searched that if there is any way for instant file sharing. After wandering sometime I found a freeware called HFS, I think it will help you too..

          • It is very easy to use.
          • No need of installation.
          • Small in size.
          • Download and check more about HFC here

          How to use?

          • Download & run hfs.exe
          • You will be asked to something to conform, click on Yes.
          • Now, Change the port number to 80 by clicking the on the Port tab at the top.
          • Drag and drop the file you want to share.
          Don't forget to check the ip of the server computer
          Now you finished the work in server, follow the steps in the client computer to download the shared files.
          • Go to browser and type the IP of the server and hit enter.
          • You will see list of file shared in server, click to download.
          Enjoy !!

          Selasa, 14 Desember 2010

          Share WebCam Over Home Network

          Using IMs like Yahoo, Gtalk etc may be the primary method to share web cam over Internet but it may not be perfect method for all time. Here I am going to show an easy method to share your web cam over your Home network & browse it from anywhere over the Internet.
          Follow the steps below:
          • Download webcamXP for your OS here and install.
          • Now run webcamXP(Go to Start > Program > webcamXP & click on webcamXP)
          • You will be asked to select the version which you want to run, select the free version & click OK.
          • Right click on the field (as shown in the screen shot) to select your Cam.
          • Go to Web / Broadcast section.
          • Click on Disable, change the port 8080 to 80 and click on activate.
          You are done!!!
          Now to check if it works or not follow the steps below
          • Go to your browser window
          • Type the IP of of your computer and hit enter.
          Follow the same process to view the cam remotely.
          Damn, it works.

          Kamis, 09 Desember 2010

          Convert TXT file to JAR ebook Online For Free

          If you are habitual of reading books in mobile(like me) then this post is dedicated for you. There are many types of ebook formats available for mobile but most of them need readers.
            Problem occurs here that there are not readers available for every mobile & sometimes you may get an incompatible format of the book which is worthless in your mobile reader.


          This is for online conversion of .txt file to .jar format for reading in mobile.
          http://qioo.de is a site offering you free conversion of text files to mobile readable jar ebook formats compatible in java supporting phones.
          Visit http://handybibliothek.qioo.de/qic.php browse the text file and click on Create.. to convert
          Save the generated .jar file and push it into your mobile to use it.
          Enjoy !!

          Sabtu, 04 Desember 2010

          Three Easy Methods to Send Message over LAN

          To Send message direct over home network at first you must activate the feature in both computers which is always inactive by default.

          • Go to Start > Run
          • Type services.msc and hit enter
          • Search for Messenger at the right side of the opening window.
          • Double click on Messenger this will open the properties.
          • Select Startup Type to Automatic and click on Apply
          • Now click Start. 
          • Wait until the service is activated & click on OK.
          (Follow the same process to activate Messenger service in other computers also.)
          Use any of the methods below to send message over LAN

                 Method One
          • Open Command Prompt (Go to Start > Run type cmd & hit enter.)
          • Now type net send (ip of the computer) message  and hit enter. (view image)
          Your message was successfully sent......

                 Method Two

          Copy and Paste the following lines in Notepad and save as anything.bat
          @echo off
          :A
          Cls
          echo MESSENGER
          set /p n=User:
          set /p m=Message:
          net send %n% %m%
          Goto A

          Open the anything.bat and type the IP of the pc, hit enter, type message and again hit enter to send. 
               
                Method three
          • Download NTMessenger here and run.
          • Type the name of the workgroup computer in the To (Or select To all option to send in all computers in that network ) 
          • Type message and click on Send button at the left.

            Enjoy :P

            Minggu, 28 November 2010

            Customizing logos in Internet Explorer

            You may have seen a animated logo of windows at the top of the right corner of  Internet Explorer, yes that one we can change according to our willing. Just follow few steps mentioned below:
            • Go to Start> Run (Win +R)
            • Type gpedit.msc and hit enter.
            • Go to User Configuration > Windows Setting > Internet Explorer Maintenance at the left side of the window
            • Click on Browser User Interface
            • Simply double click on Custom Logo at the right side of the window. 
            (There should be other options also such as Browser Title, Browser Toolbar Customization etc. you can make several modifications in your IE with them, try yourself.)
            •  Browse bitmap images of appropriate size and click on OK to save.
            You are done !!!
            Check if it worked or not.